Hokkaido Itinerary: My 8D7N Winter Backpacking Trip With S$1800
From Niseko to Otaru and onwards to Utoro via Sapporo, this Hokkaido itinerary takes you through the best of the island. Winter activities, onsens and lakes, and oh-so-amazing food await.
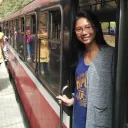
Contributed by A Pair of Eyes
I finally made it to Hokkaido after more than 20 years of dreaming about it. Hokkaido is the first and furthest destination on my travel bucket list. It is those scenes of soaking in rotenburo (open-air hot springs) under the snowflakes, the saliva-inducing fresh Hokkaido crabs and sashimi, skiing in powder snow and perfect dreamy winter landscapes that piqued my interest. I hesitated no longer and booked a ticket for myself when Scoot launched the route to my dream destination.
It was a destination that I had in my mind but hadn’t been actively planning for due to potential high expenses. Also, as I was young then, the idea went to the back of my head eventually. However, after this trip, I honestly feel that it can be done affordably, without compromising the overall quality of experiences garnered.
Focusing on winter activities, I began my trip from Niseko in the East and moved on to Utoro on the Western coast. The distance travelled was undeniably long but it was an acceptable balance of travelling and exploring for me. If you don’t mind long rides or changing your accommodation daily, this 8D7N itinerary might just be right for you to get the best of Hokkaido.
Total Expenses (Per Pax)
*S$1 ≈ 80 Yen
Attraction/Activities: 33,000 Yen (incl. ski gear rental)
Accommodation: 18,521 Yen
Transport: 28,730 Yen
Food & Drinks: 26,026 Yen
Miscellaneous: 1,900 Yen (locker rentals & tips)
Total: 108,177 Yen ≈ S$1352.21 + S$467.51 (flight incl. 20kg check-in luggage for return leg)
= S$1,819.72
The snacks in Hokkaido aren’t cheap. Add another minimum of S$200 for all your shopping needs and you should be able to do Hokkaido under S$2k!
Day 1: Niseko (Hirafu Town to be exact)
My flight landed in Chitose Airport at around 4 pm and Niseko is about 3 hours away. Clearing immigration was swift especially since I didn’t have check-in luggage. There are also a few changing rooms at the arrival hall for you to get properly dressed for the weather. Even if you are hopping onto the train immediately, do put your jacket on as it gets really cold at the train station. The JR train is heated, including seats, and you can take them off inside.
By the time we arrived in Hirafu Town, having dinner was the only thing we could do before resting for skiing the next day.

Getting to Hirafu Town from New Chitose Airport
Hirafu Bus from Kutchan Station
There are direct buses from the airport which can be cheaper and more convenient than trains. However, there were none after my arrival time, so JR train was the only choice (2630 Yen, 3 hrs duration with a transit at Otaru). HYPERDIA is a great website to check for train schedules and prices. It also tells you which platform you arrive at and which platform you are departing from for connecting trains. Whether by bus or train, the trip will take around 2.5 to 3 hours. Change to a local bus (Donan or Hirafu bus, 390 Yen) upon arrival at Kutchan Station bound for Hirafu Town, which is approx. 15mins away. We alighted at Hirafu Welcome Centre and one of the staffs assisted us by arranging a van pickup. If your choice of accommodation provides pickup services, do liaise with them directly in advance.
Getting around Hirafu Town
Niseko United Shuttle (NUS): If you bought the All Mountain Pass (which gives you access to all of Niseko’s ski resorts), Niseko United Shuttle will take you around Hirafu, Niseko and Annupuri during ski season for free. If you have a 12-point ticket, one point per trip is needed. A ride costs 500 Yen for adults and 300 Yen per child. Based on 2017 schedule, it seems that NUS does not travel to Kutchan Station before 5 pm.
Hirafu Village Grand Shuttle Bus: Free shuttle bus around Hirafu town every 15mins, which brings you to Grand Hirafu Ski Resort as well.
Where to stay?
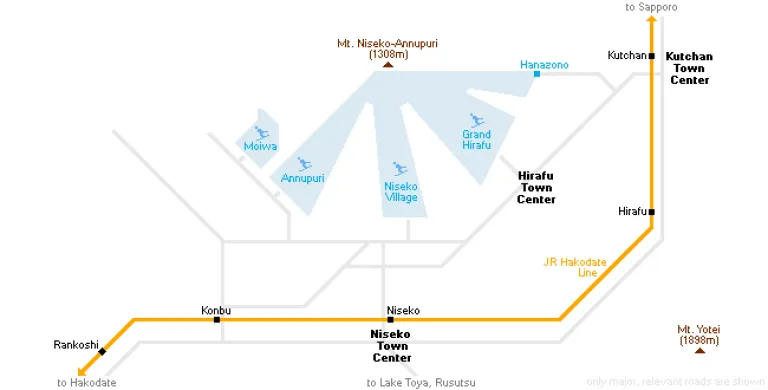
Image credit: Japan-Guide
Hirafu town would be the most foreign-friendly with lots of bars, restaurants, accommodations, shuttle and local buses to get around (very important if you don’t have your own transportation!), and plenty of food recommendations are based here. We stayed at Lodge Bamboo (4725 Yen per night for a bunk bed) which was very cosy and clean. Breakfast was either toast with jam or cereal. A good point to note would be that the shuttle bus around Hirafu stops at the foot of the lodge, which is just a minute walk away.
During my research prior to the trip, I could still find dormitories for S$40+/- per night in a bunk bed, though these are normally located out of the town centre. As the date of the trip approached, these were all occupied and it was hard to find budget accommodations for two travellers. Do book in advance or risk paying more! They could easily start from S$300 per night for a double bed at the cheapest.
What to eat?
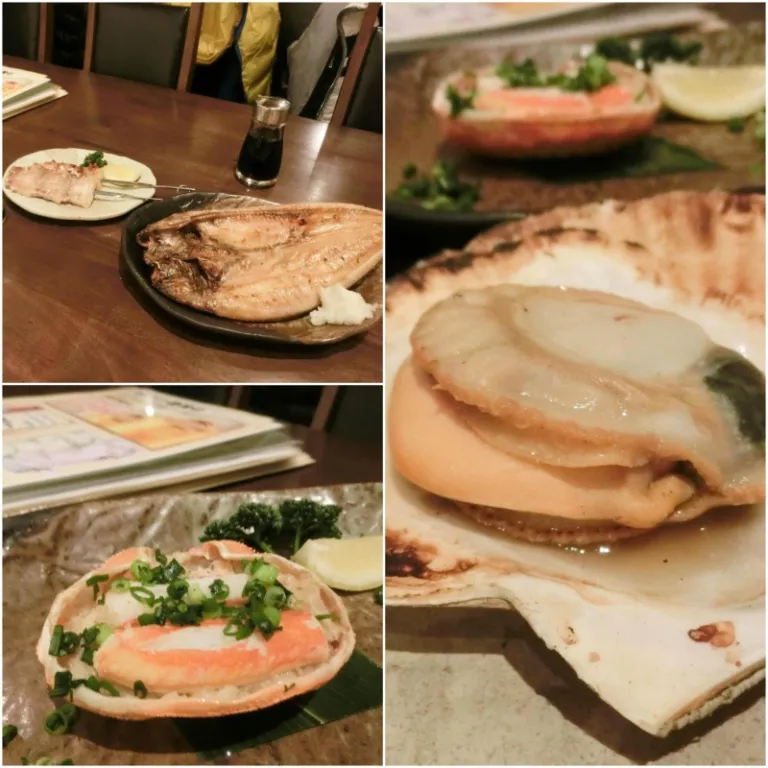
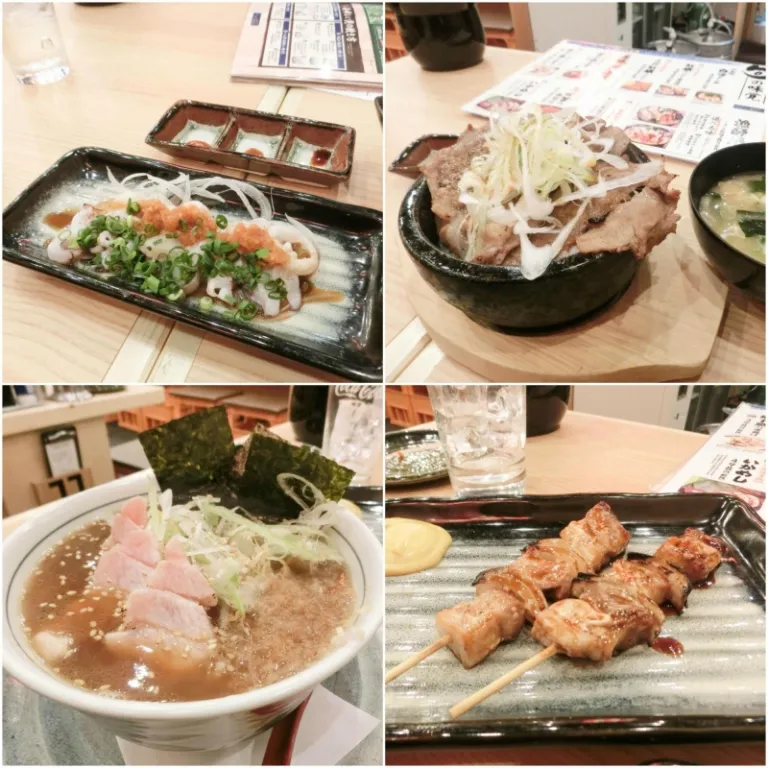
We dined at Raku Izakaya on the first night – recommended for their yakitori, buttery grilled Hokke fish, grilled king crab legs. 1 Big Hokke (1800 Yen. Good for 3 to 4pax as a side, a main for 2), 1 grilled snow crab (1390 Yen), 2 Hotategai (820 Yen each), 1 pork skewer (460 Yen, Best I’ve ever eaten!) and 1 Kurabitosyu (800 Yen, Hot Sake) cost us 6,577 Yen (approx. S$82) in total.
Will definitely return for the pork skewer, huge Hokke, and affordable sake!
I found a few other recommendations online, listed on Day 3. Dining in Niseko can be expensive, with consumption tax at 8%!
Day 2: Niseko
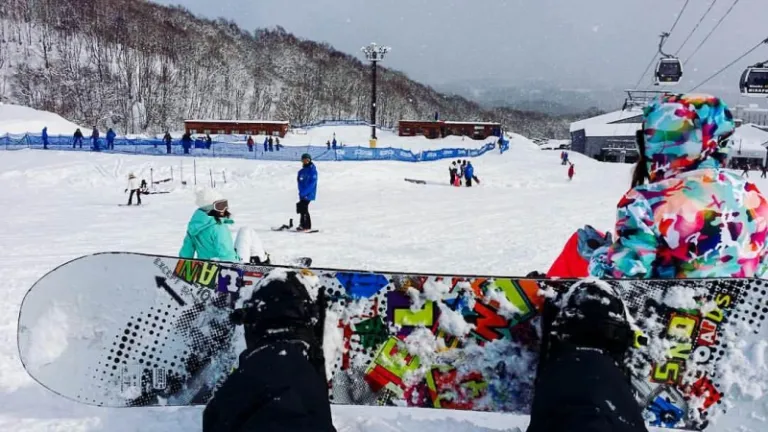
The main activity for the day: skiing/ snowboarding! I booked an Adult First Timer Group lesson with GoSnow about three weeks in advance when I received a newsletter from them offering “Bring A Friend For Free” program (13000 Yen = 6500 Yen/pax). This is a 5.5 hours lesson (incl. 1 hr lunch break), for first timers as the program name suggests. It is possible to book one person on a ski and the other person on a snowboard lesson if you wish. Overall, my experience with GoSnow was pleasant albeit my slack instructor.
The “Bring A Friend For Free” program does not include the required gear and lift tickets.

Since it was a first timer lesson, we didn’t get to ride on the lifts at all the whole day. We spent more time sliding down the mild slopes and climbing back up. The same applied for those who went for the ski lesson. I felt like it was quite a waste especially since the tickets weren’t cheap. So I went to the counter explaining that I was asked to get the lift pass for my snowboard lesson but the lesson did not require us to use the lift at all. To my pleasant surprise, they gladly refunded me.
For gear rentals, we got ours from Grand Hirafu (14200 Yen for 2-day full set rental; snowboard/ski set + ski wear + beanie + goggles + gloves). Though there were cheaper options, it required us to visit their stores for gear fitting a day before, which was not possible for us since we arrived rather late. Gear fitting will take about 30mins and could be longer if the rental shop is extremely busy. Get there as early as you can! Rental lockers to store your clothes are from 400 Yen.
What to eat?
For lunch in-between ski lessons, there’s a cafe at the base of Grand Hirafu ski resort. There is also an inexpensive lunch place called Boyoso. We tried none of these but the reviews online seem okay.
As for dinner, we went to try another recommended place, Niseko Ramen Kazahana for their potato foam spicy miso ramen (3.5 stars). We went almost immediately after they opened for dinner and it was already full when we got there. Since our lesson ended at 3:30 pm, we went for a tea break at Jojo’s Cafe & Bar while waiting for the restaurant to open. They had pretty good cakes and coffee (3.5 stars)!
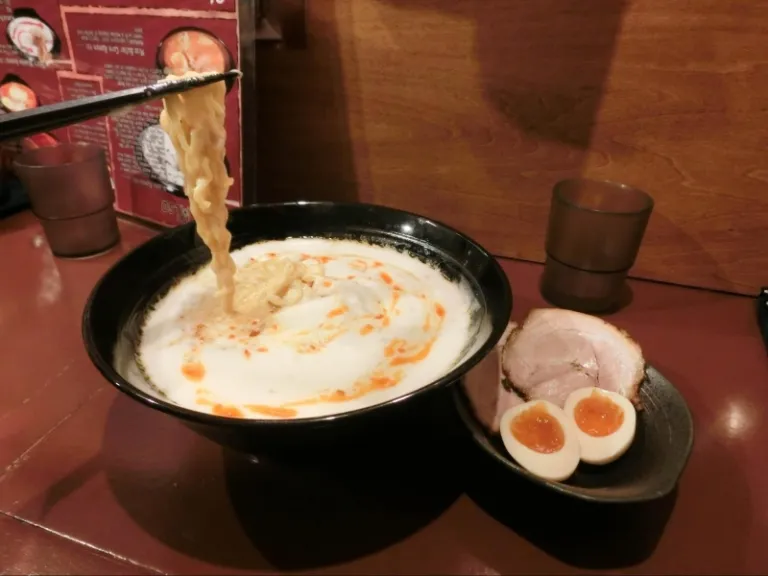
Potato Foam Spicy Ramen with Chashu and Onsen Egg add-on
While doing research, I came across pictures of a cute little fridge door which turns out to be Bar Gyu (4 stars). We went for the sake of getting some pictures with the fridge door and a few drinks but surprisingly, it was really cosy with candles on our table and large window panes behind the bar where we watched the snow fall. Although a bit cramp, the bar served awesome charcuterie and cocktail. We waited around 15 minutes to get seats for both of us.
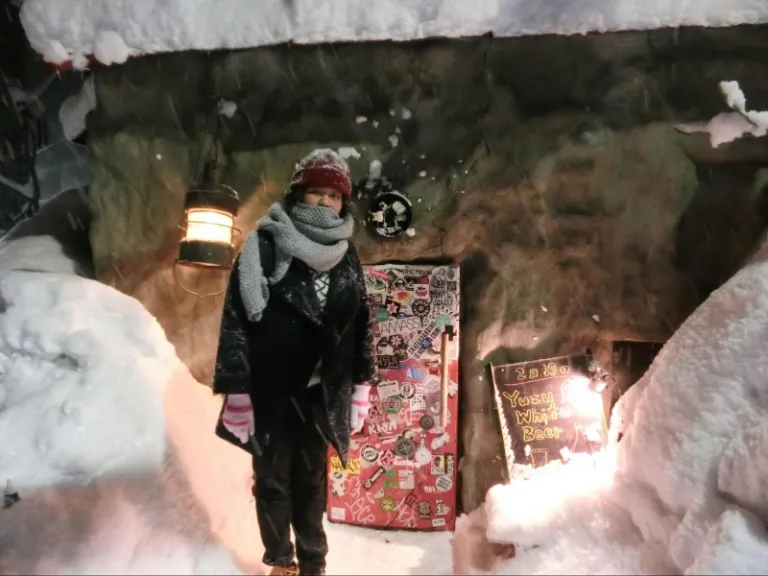
Bar Gyu, Hirafu Town

Day 3: Niseko
Upon checking out, we placed our bags in the communal area and went for another ski sesh. Being a first timer, I didn’t know how to get on the lift with my snowboard. I hesitated to get a lift pass for the day and instead, went sliding down the mild slopes and climbing back over & over again until I got so drained that we went back to our lodging for siesta.
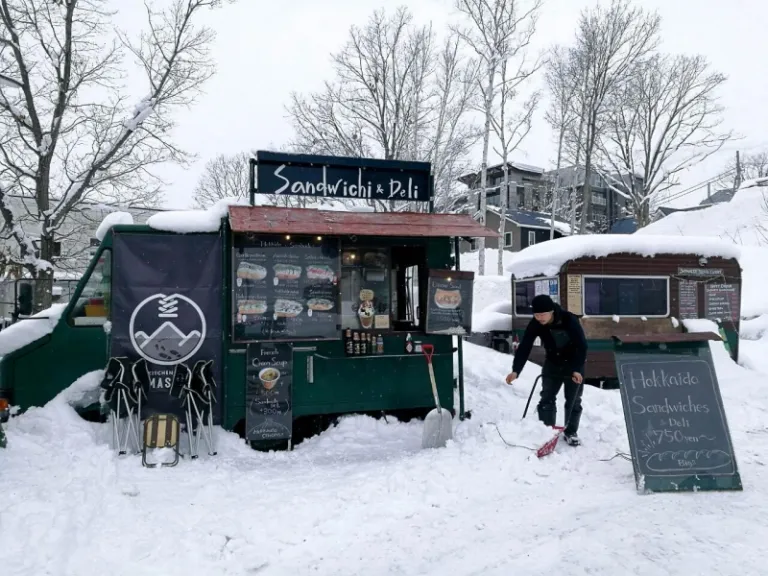
For lunch, we headed to those food trucks near Hirafu Grand Shuttle Bus Stop #1. These turned out to be my favourite in Niseko. Do eat at Sandwichi & Deli truck, especially if you are on a budget. There’s a selection of trucks for you to choose from and they serve delicious meals (not that I tried all, but the reviews online say so). One even served mulled wine at an affordable price, which is exceptionally great in the freezing cold!
Other food recommendation(s):
- Bang Bang – popular for its yakitori (2 locations)
- Abucha 2 – recommended for Suki-yaki, baked Hokkaido potato with butter, tofu tomato salad.
- Niseko Supply Company – fresh croissants (which sell out fast), raclette and fondue set menus
- Yakitori Yosaku – beef skewers and cheese tomato
- Crab Dining Kanon – crab feast!
- Sessa Wagyu Hotpot – sukiyaki or shabu shabu. Complimentary transfer for dinner available upon request.
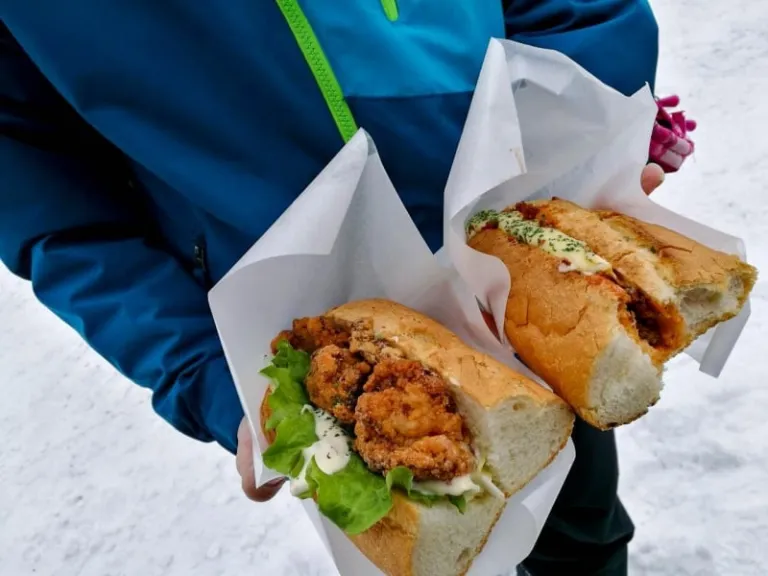
Note: Although I tried some recommended restaurants – Raku Izakaya and Niseko Ramen Kazahana – I still prefer the delectable sandwich sold at the food truck!
Torn between leaving Niseko without getting on the lift, I couldn’t resist the temptation and got myself a night lift pass at 2700 Yen for usage after 4:30 pm till the ski resort closed. For the first ride, it is best to get someone riding solo to guide you. After coming down the beginner slope for the first time, I can only say that I should have gone up the slopes earlier as it was nothing close to the snowboarding experience.
But we left for Otaru that night, I still enjoyed a short snowboarding sesh, which was absolutely awesome!
Recommendation(s):
If you would like to go skiing/snowboarding after 4:30 pm, Hirafu also offers hot springs or other winter activities such as snowmobiling that you can try.
Day 4: Otaru
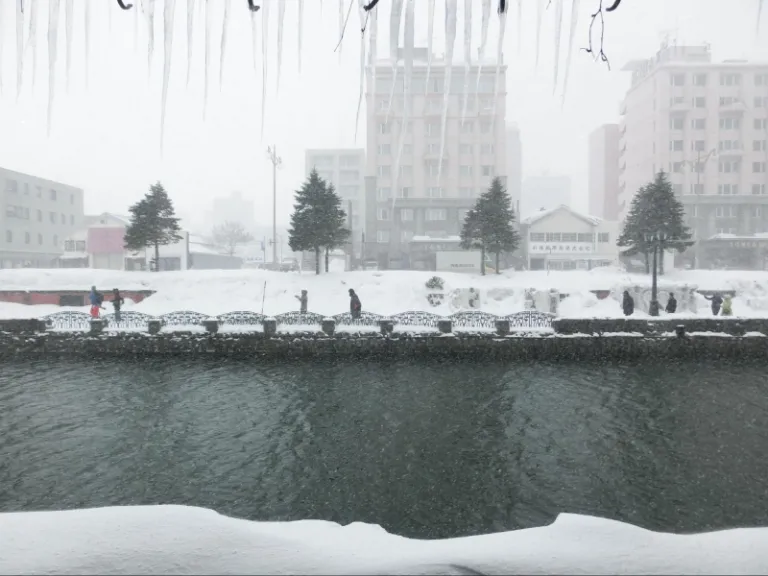
We just missed the Otaru Snow Light Path Festival (next one is from 9 to 18 February 2018). Otaru was the coldest for us, probably because it is close to the sea and the winds here can be really strong. We were freezing to our bones!
Getting to Otaru from Hirafu Town
From Hirafu town, we took the bus back to Kutchan station (15 mins, 360 Yen) and caught a direct train to Otaru (60-70 mins, 1070 Yen).
What to do?
Otaru is known for its music box museum and glass works, apart from Otaru Canal. The streets are such a bliss to walk in with music coming from gift shops. I recommend you to start your day early and have at least a full day to explore. We started exploring after breakfast at about 11 am, and had enough time to visit music box museum, beer museum, Otaru canal, the bank of Japan Otaru museum and a few glass shops along Sakaimachi Dori.
Looking for more attractions in Otaru? Looking for some local food in Otaru? Then, Otaru Walking & Street Food Tour by MagicalTrip is the way to go. The tour will cover the major sight-seeing spots of Otaru, together with recommended street food. Do not forget to taste the local seafood!Other attractions include:
- Otaru Rail Museum
- Canal Building
- Museum of Venetian Art
Where to stay?
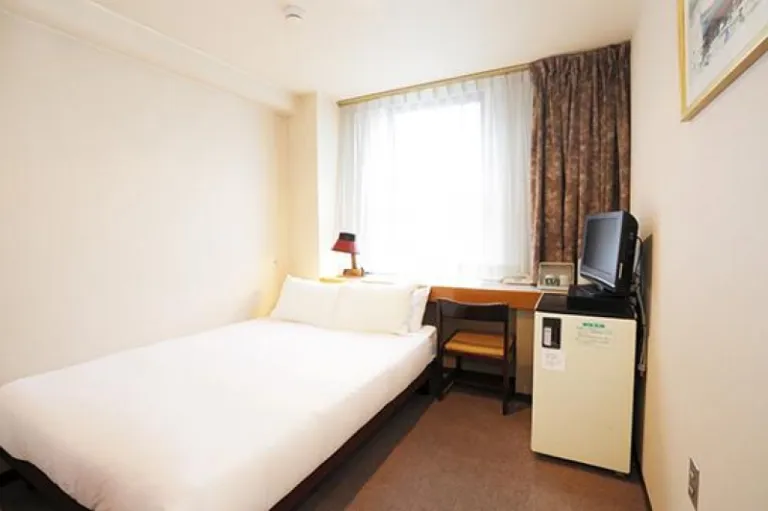
Image credit: Smile Hotel
Arriving late at night from Niseko, it really helped that our hotel was just two streets away from the train station. Smile Hotel Otaru has smoking & non-smoking rooms, so do select the right one for you. Our room (4800 Yen per night, double ensuite w/ breakfast) was small but clean enough, and the breakfast was a hearty meal. Do bear in mind that the double bed here is more like super single, similar to those in HK (if you know what I mean!). So do look for a proper queen or king size bed if you are bigger in size. They provide luggage storage as well with tags for claiming it. The only con was the shower which took quite a while for the water to get heated.
The cheapest accommodation in Otaru I found was S$30 in a bunk bed or S$60 for a double ensuite. These may or may not include breakfast.
What to eat?
Right outside Otaru station, along Chuo Dori (Dori means “street”), there are a few restaurants that stay open throughout the night and they are pretty affordable. We dined at 濱焼北海道魚萬 on the night we arrived. Nothing remarkable, but was at least not awful! Along Sakaimachi Dori are some seafood restaurants (looks like a small wet market with all the fresh seafood displayed at the storefront, with the dining area at the back) serving affordable crab hotpot, kaisendon and chirashi etc. Recommended to dine here as they are affordable and of great quality.
We didn’t get to try any of these seafood restaurants along Sakaimachi Dori which are listed below, but they received good reviews on the internet!
- Ajidokoro Takeda – affordable kaisendon
- Naruto chicken Otaru – heard that it is one of the must-try in Otaru!
- Isezushi – sushi & sashimi (slightly on the higher-end)
- Yabuhan Soba – buckwheat noodles
- Sawasakisuisan Kaisenshokudo – kaisendon
- Kantaro – affordable and fresh sushi
- LeTao – famous for many things such as their double fromage cake, crepes, deu fromage roll, royal montagne, vanilla milk ice cream, cheese soft serve etc.
Day 5: Utoro
Not many people come here as it can be a bit of a hassle to arrive without a car. After a day in Otaru, we headed to Sapporo by train (40 mins, 640 Yen) where a direct overnight bus to Utoro can be taken. We bought some snacks (a.k.a. our dinner) from the convenience store next to the bus station. The nearest train station for Utoro is Shari station, 45 mins away by car. There are no overnight trains to Shari so an entire day would be spent on travelling if via train.
Taking the overnight bus was quite a tough decision, considering how slippery the road can be during the winter as ice could form. The ride was really smooth and I slept throughout the night, waking up at sunrise in Utoro. This is a coach fitted with toilets, and they separate the males and females with a curtain. With single seats in three rows, reclinable chairs with footrest and slipper, the ride was really comfortable.
The Eagle Liner leaves Sapporo at 11:15 pm, arriving Utoro at 6:30 am, (8230 Yen one-way or 15430 Yen return). Students can show their student pass and get it at 7200 Yen one-way or 13370 Yen return.
Upon arrival at Utoro Onsen Bus Terminal, we placed our backpack in one of the lockers for 500 Yen (3 different sizes: The largest one is 500 Yen; might not be able to fit anything bigger than a carry-on size limit. We fitted two 40L backpacks into one. No time limit!). There’s also a toilet for you to wash up, though the water was freezing cold.
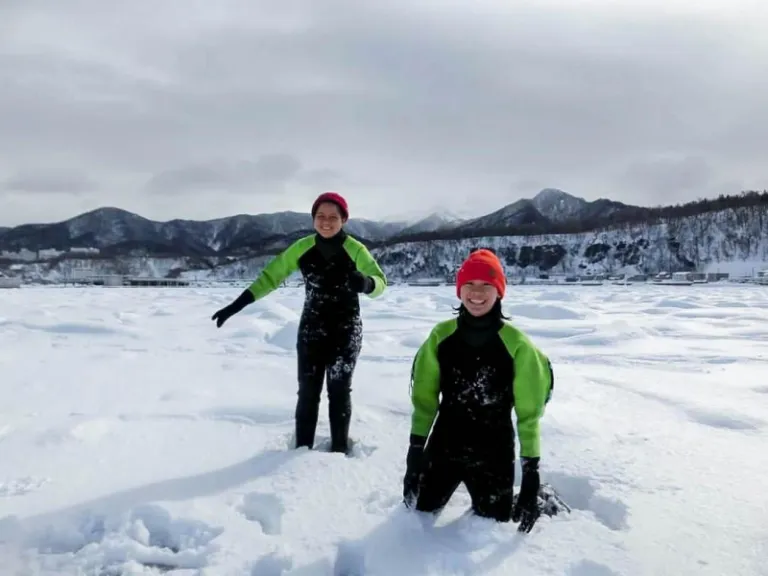
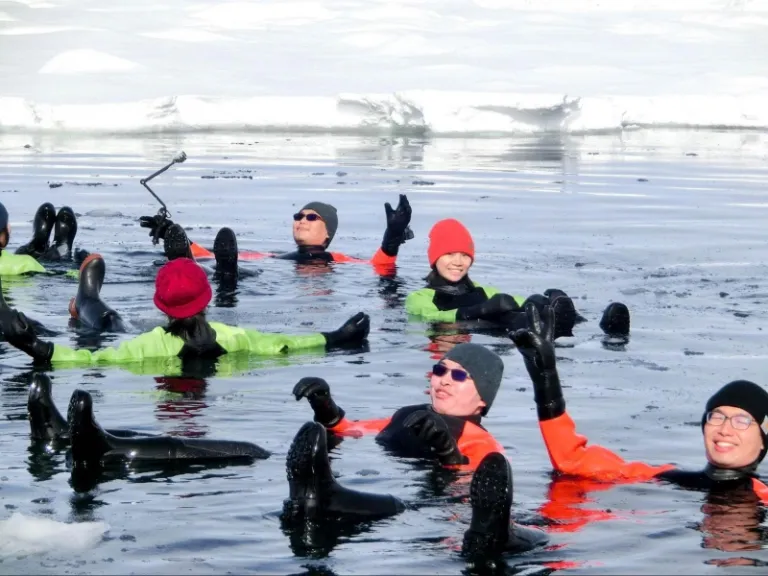
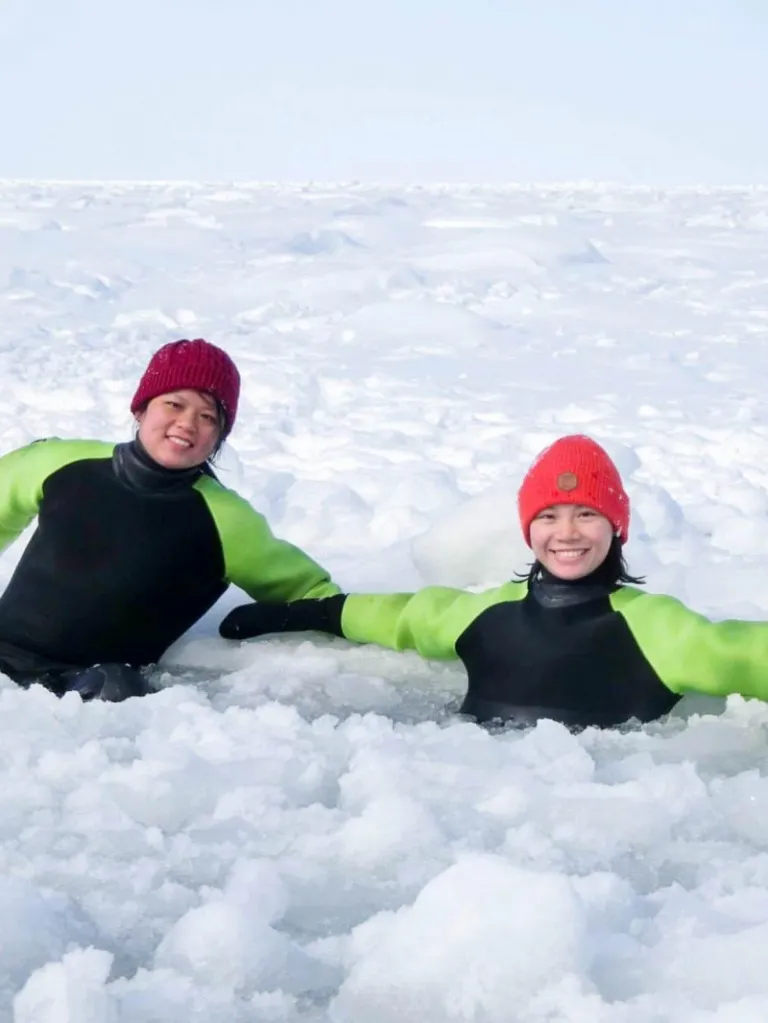
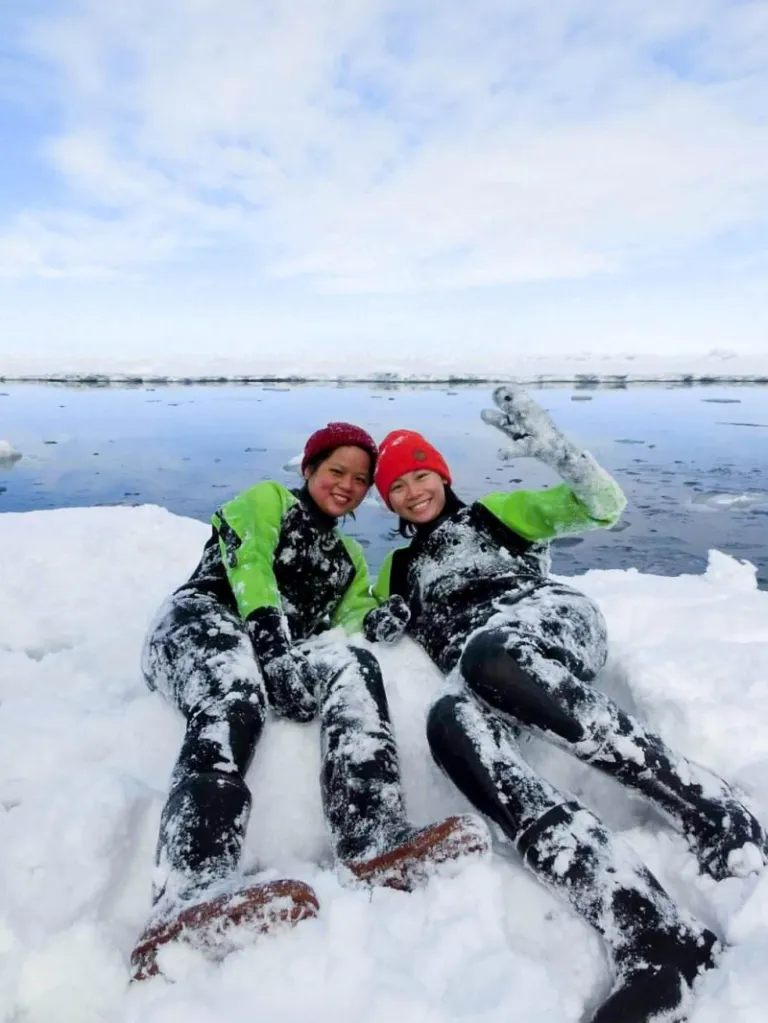
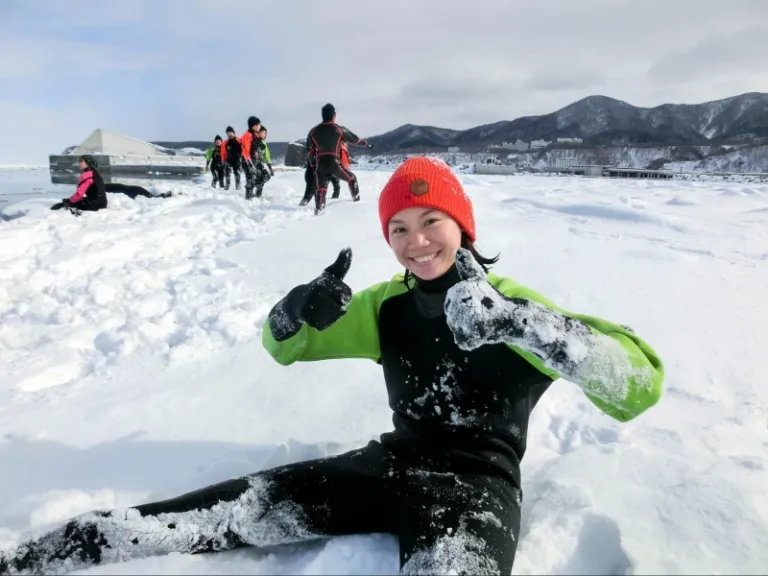
Things were a bit rushed and I didn’t get to book a tour in advance. We wanted to join a guy on a tour he booked earlier but it was already full. So, we walked around town and found this tour agency that offers Drift Ice Walking Tour + Snowshoe Tour at 9000 Yen per pax. If possible, do the drift ice walk during sunset tour as the scenery is amazing. The day looked gloomy for us, so it didn’t matter.
Sea of Okhotsk is the southernmost area in the Northern hemisphere where drift ice may be observed, and it is pretty cool to be walking on them. We walked pretty far out into the sea (yes, the sea is just below!) before we found a body of water which we dove into. Not exactly enjoyable, it required a lot of strength!
After the drift ice walking tour, they dropped us off at this area with a few restaurants for lunch before another agency came to pick us up from across the street for the second part of the tour – snowshoe walking! The tour guide spoke limited English, but was very patient and had a sense of humour. Few Japanese on the same tour spoke English and translated for us from time to time so we could understand as well. At the end of the tour, they will drop you off at the bus terminal or your hotel while we chose to stop at their office as we saw an onsen (hot springs) next to it earlier.
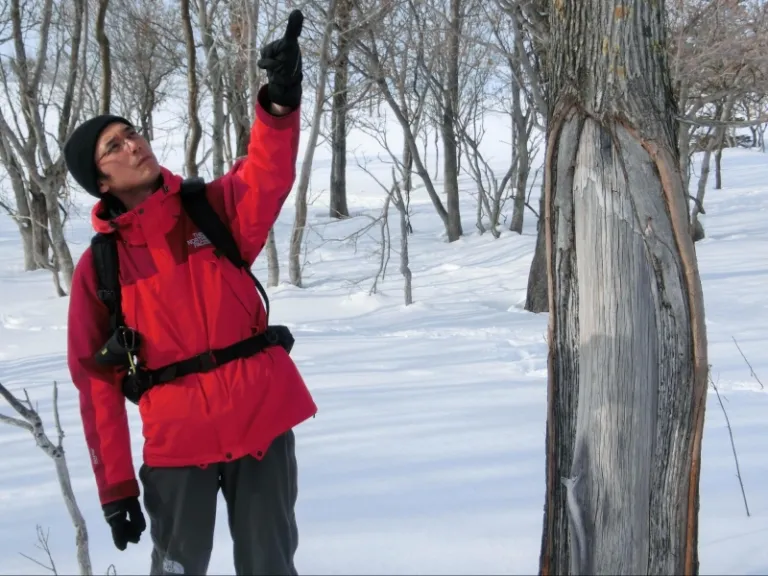
Guide for the snowshoe walking tour
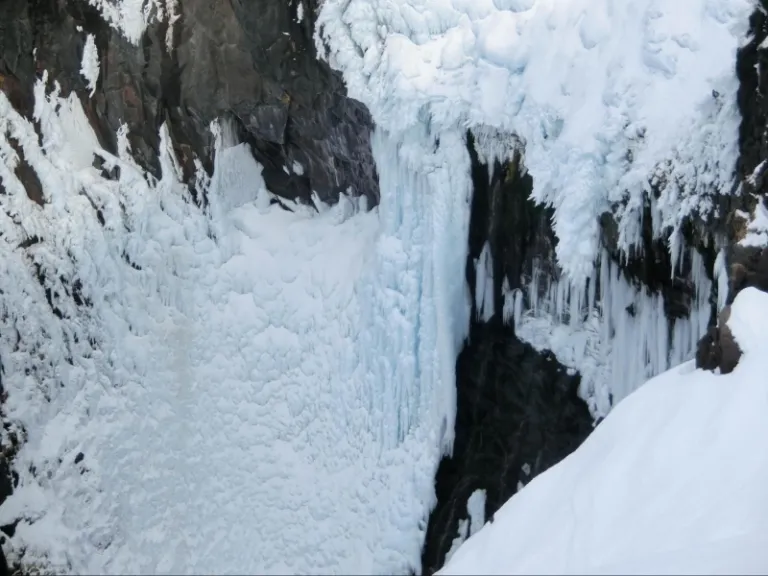
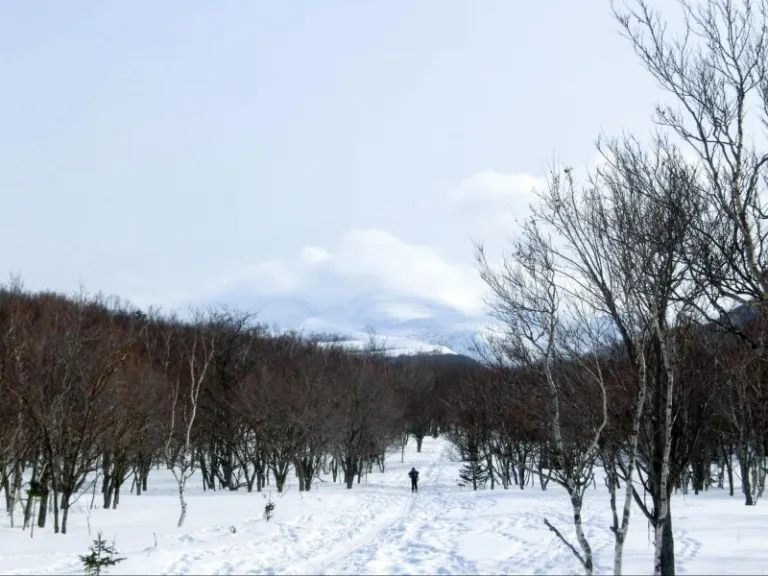
Frozen waterfall
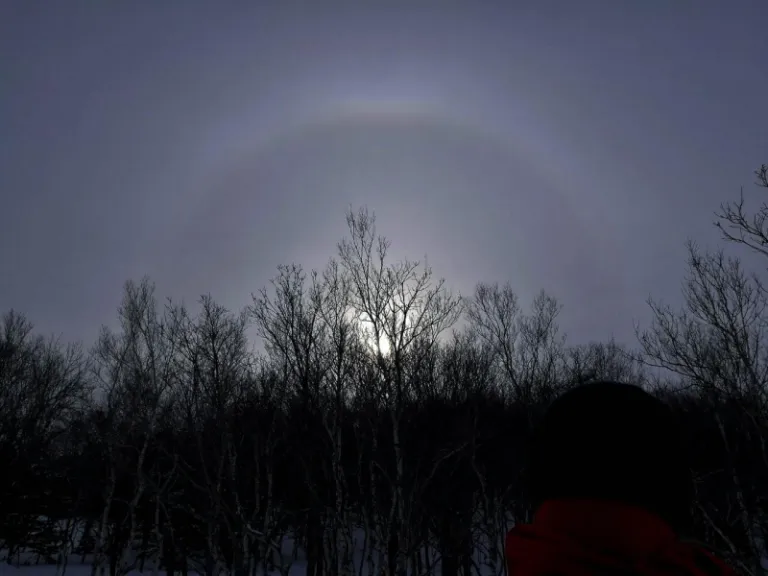
Halo; a natural winter phenomenon spotted during a snowshoeing tour
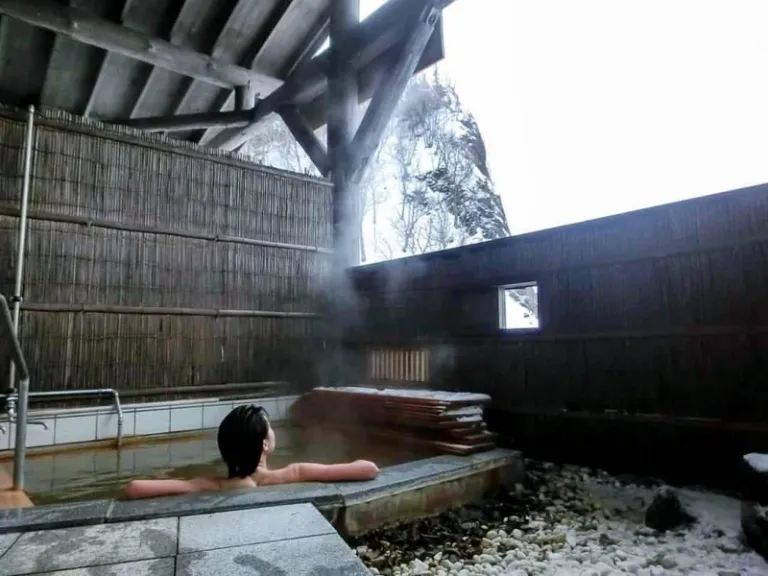
Couldn’t have made a better choice than to end the day bathing in rotenburo with the snow-capped mountain in sight. Since it was slightly out of the city centre, there were no other guests during our time there. The onsen has two showers (soap, shampoo and conditioner provided), a hairdryer, one indoor and one outdoor open-air bath. This is just at 600 Yen per pax, with no time limit. Shiok!
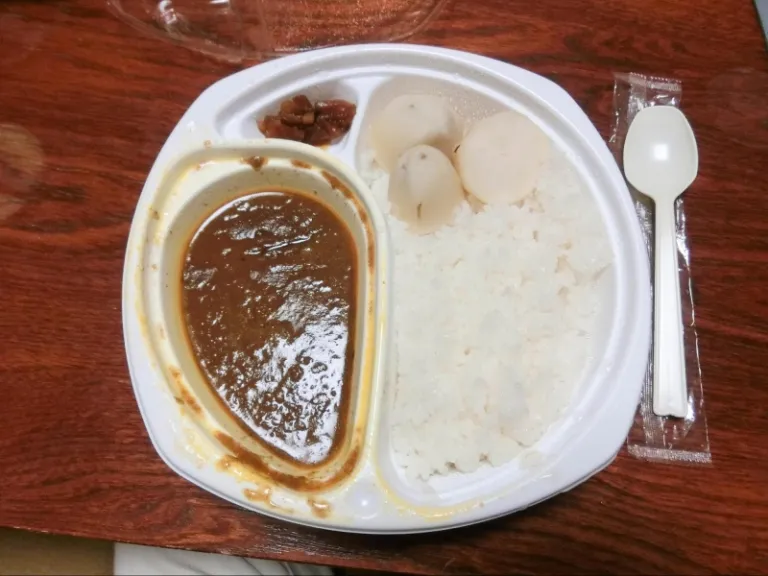
After a rejuvenating bath, we walked along the main road towards the bus stop, reaching the town centre in about 15 minutes. There wasn’t much traffic and it was safe with street lamps along the way. As we passed by Bon’s Home, a cafe which is also a hostel, we got a potato cake (420 Yen) and potato curry rice (1080 Yen) from them as recommended online. The potato cake did not disappoint, and I would recommend it too! The potato curry rice, whilst delicious, was a shocker with only plain rice, curry and few chunks of potatoes. Expensive considering I paid S$13.50 for this.

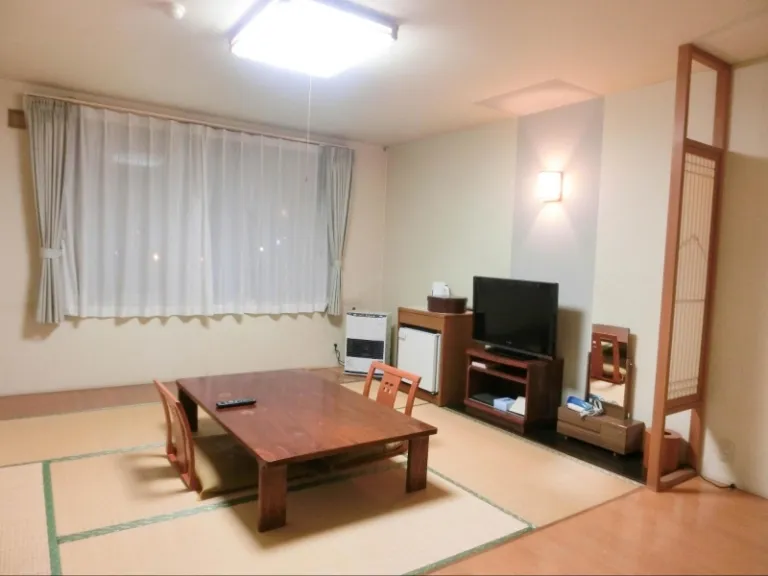
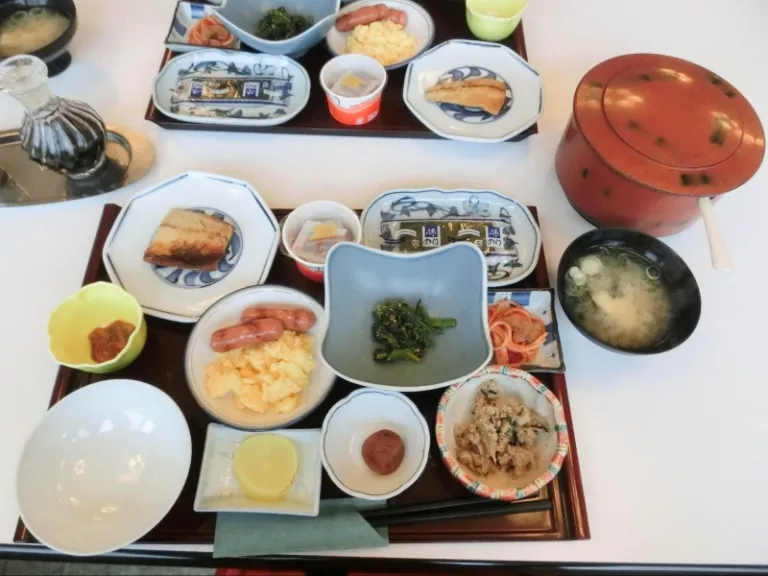
With this, we took the last Shari Bus at 6:30 pm to Shari (1650 Yen one-way, 50 mins. Schedule can also be found at Utoro Onsen Bus Terminal) and spent the night at Shari Central Hotel, conveniently located a three-minute walk away from Shari JR Station. We booked a Japanese style triple room ensuite, sleeping on tatami for 8000 Yen. The staff will come up and lay the bed for you at your preferred timing, so do prepare tips (not obligatory). Clean and comfortable, the room also included a tea set which was lovely to have along our dinner. Breakfast is at 700 Yen per pax – do get the breakfast option especially if you are heading off early the next day. The breakfast they served was a delicious typical Japanese cuisine which includes few side dishes along rice and soup (3.5 stars).
Tatami Room at Shari Central Hotel, Shari
Tatami Room at Shari Central Hotel, Shari
Day 6: Lake Kussharo and Lake Mashu
Lake Kussharo has a few rotenburo, which was my main experience for this trip. We decided on Kotan Onsen Rotenburo which is a free and open to the public. It can be closed on Tuesdays, Thursdays or Fridays for maintenance.
Getting to Lake Kussharo from Shari/ Utoro
We took the earliest train from Shari Station to Kawayuonsen Station at 7:26 am (930 Yen, 50 mins. Not possible if we had stayed at Utoro instead of Shari the night before), arriving at 8:19 am before transferring to Kussharo Bus at 8:25 am on the Teshikaga Eco Passport (1500 Yen for 2-day ticket. There’s no one-day ticket). This is a hop-on-and-off bus that brings you around Lake Kussharo and Lake Mashu and is the only bus that goes to Kotan Onsen. The bus also stops at Mt. Io and Sunayu for 20 minutes and 15 minutes respectively, perfect to get a glimpse and take some photos before we got off at Kotan Onsen at 9:32 am.
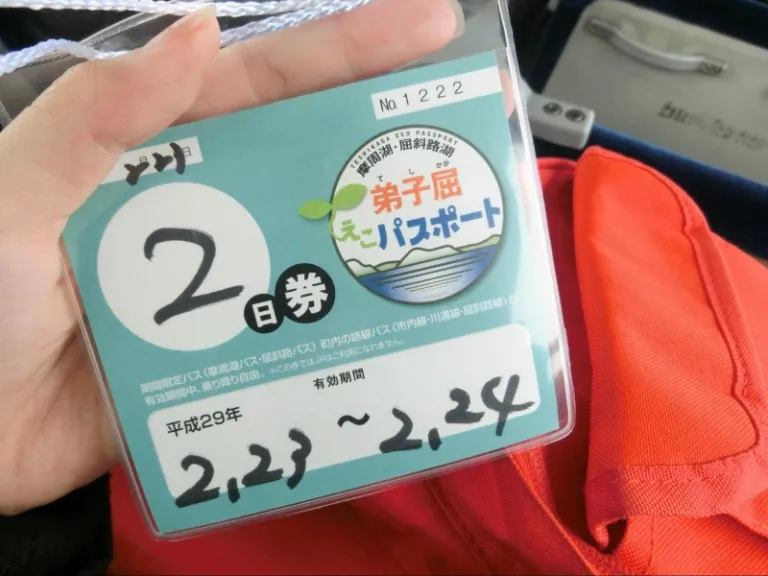
Teshikaga Eco Passport

Teshikaga Eco Passport now provides free luggage storage at Kawayuonsen Station and Mashu Station from 8 am. When we went, the free luggage storage was only offered at Mashu station, so we had to carry our luggage with us. You can leave your baggage on the bus as you alight at Mt. Io and Sunaya for photo-taking. Needless to say, carry your valuables with you at all times.
*Do note that each season’s schedules are different. Check back when they release the schedule for the season you are visiting.
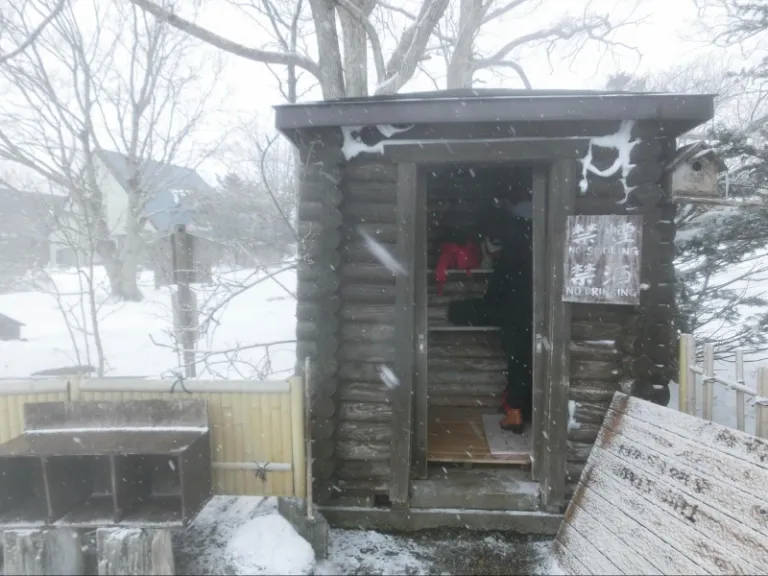
The facilities at Kotan Onsen includes a changing room (no shower), men and women separated, with shelves to place your belongings. There’s also a storage place outside the changing room, similar to those shoe racks in kindergarten, which you can spot from the onsen. So don’t worry about it getting stolen!
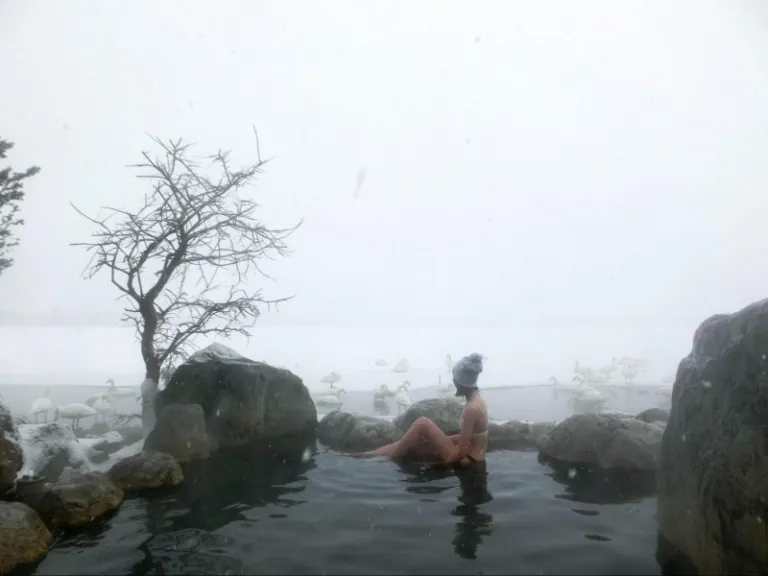
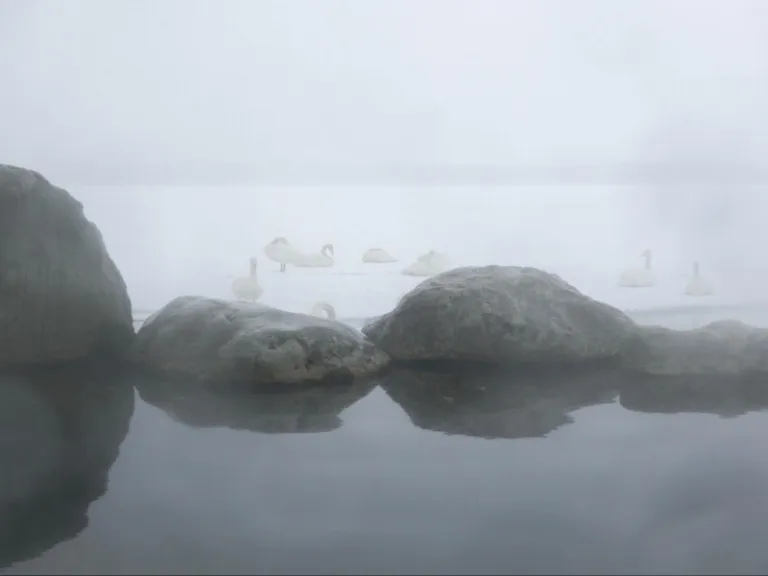
Men and women baths are in the same pool, separated by just a stone wall in between. Don’t be traumatised when they bath naked as it is customary in Japan. Throughout the experience, we were only joined by a local elderly couple. Highly recommend experiencing at least one of these rotenburos around Hokkaido. The water temperature is just right! After soaking in it for some time, you can withstand the cold under the snow without clothes on. Just dip in again when you’re feeling cold! Hot springs bath really does refresh one’s mind & body.
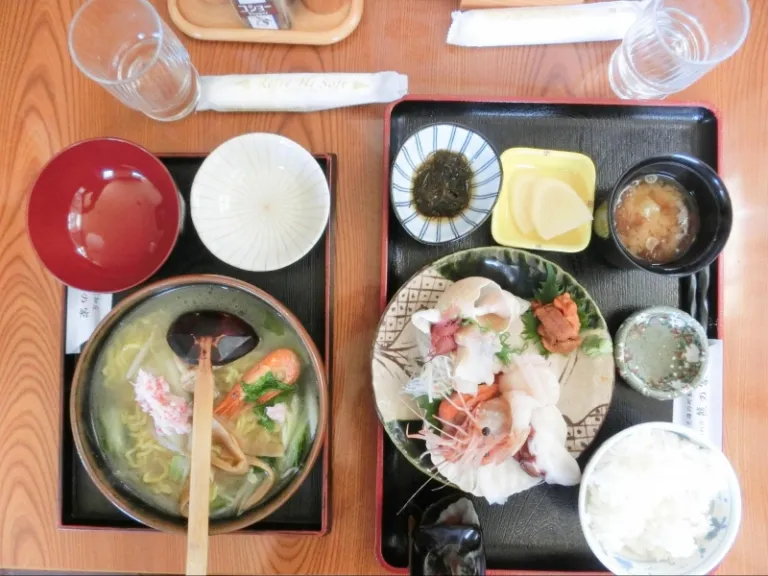
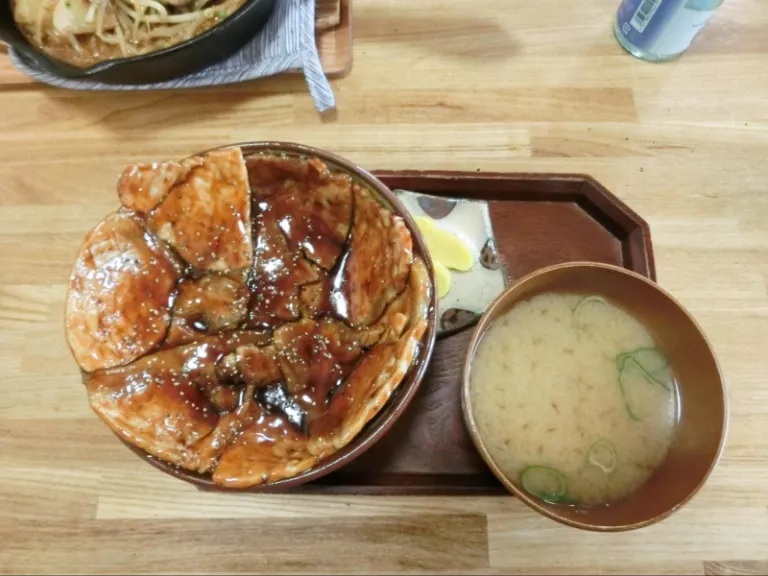
We went into a restaurant, just next to Kotan Onsen along the road, while waiting for the bus to Mashu Station and stumbled upon one of the best ramens I’ve ever had (1200 Yen). It is a milk-based ramen, the only one that’s on the menu. The owner stood by the door, looking out for our bus as they only served the dish 10 minutes before our bus is scheduled to arrive, and transport in Hokkaido was almost always on time. Though a bit rushed, do eat here if you have at least 40mins to spare (the wait was pretty long though, there were no other diners). It was so good!
If not, have your lunch back at Mashu station where we dined at before catching the train to Obihiro after Lake Mashu. Next to Mashu Station lies a small restaurant which serves sliced pork rice (3 stars), recommended by staffs at the train station. We also tried Genghis Khan here (2.5 stars), which is a must-try dish in Hokkaido. It might be better to try it at restaurants specialising in it!
Recommended sliced pork rice next to Mashu Station
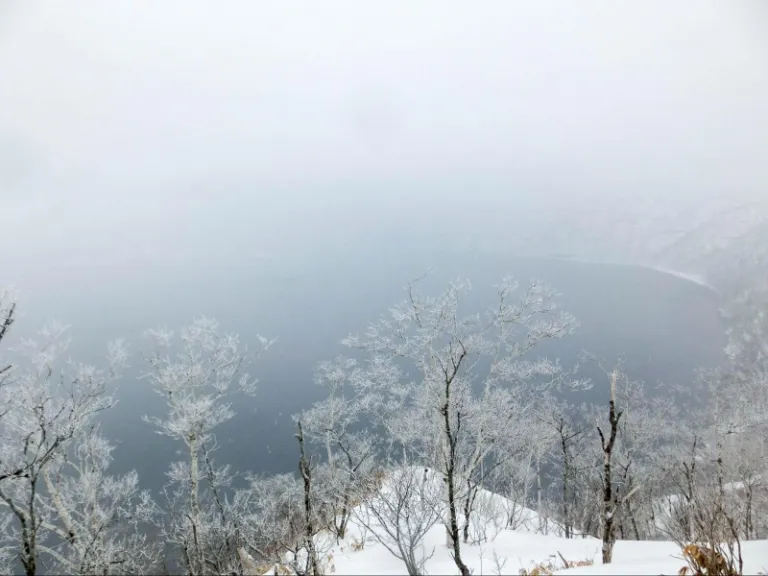
Arriving at Mashu station at 12:10 pm, we tried our luck hitch-hiking to Lake Akan as there was no public transport heading there from Mashu station after this timing. But luck was not on our side. With the eco passport we bought, we went to Lake Mashu instead, dubbed as the clearest lake in the world. We are not allowed to go down to the lake, only observable from the observation deck which the bus brought us to. The lake is often blanketed by fog in the winter, so count yourself lucky if you are able to see the body of the lake. You can place your luggage at Mashu station for free while you head to Lake Mashu.
Lake Mashu
The trip to Lake Mashu was pretty short, and we returned to Mashu Station by 3pm before travelling for the rest of the day to our next stop – Obihiro.
Getting to Obihiro from Lake Kussharo
From Mashu Station, we took the JR train to Kushiro Station departing at 5:23 pm, arriving at 6:46 pm (1640 Yen, 83 mins) before changing to another train for Obihiro station at 7:26 pm, arriving at 10:17 pm (2490 Yen, about 3 hours). We bought our tickets all at once at Mashu station for 3990 Yen instead of 4130 Yen.
Alternative: There’s a faster train – Super Ozora Limited Express – for the Kushiro station to Obihiro station leg at 4810 Yen, taking 90 minutes reaching Obihiro at 8:32 pm.
Where to stay in Obihiro?
Spent the night at Hotel Nupka (2200yen for a bunk bed in the dormitory). Comfortable bed, clean sleeping space and shared bathroom equipped with shampoo, soap, conditioner, hair dryer etc., and close to JR station. They stored our luggage the next day while we headed to Lake Shikaribetsu Kotan.
What to eat in Obihiro?
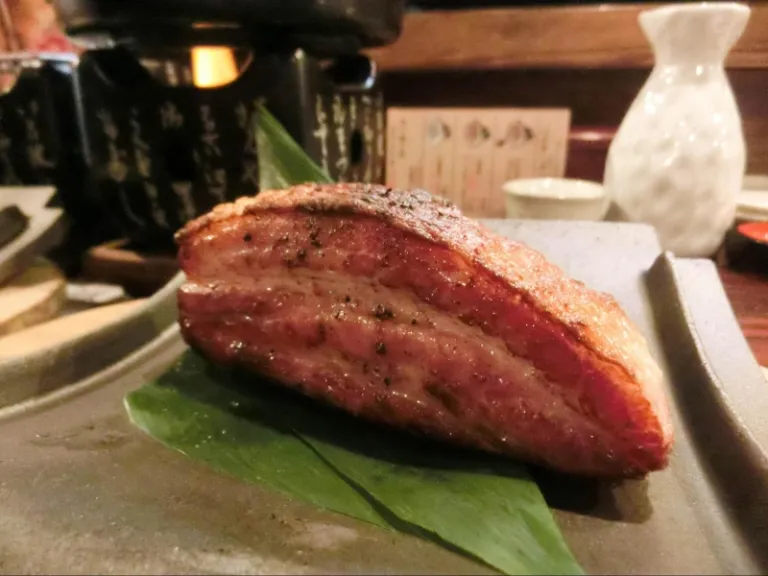
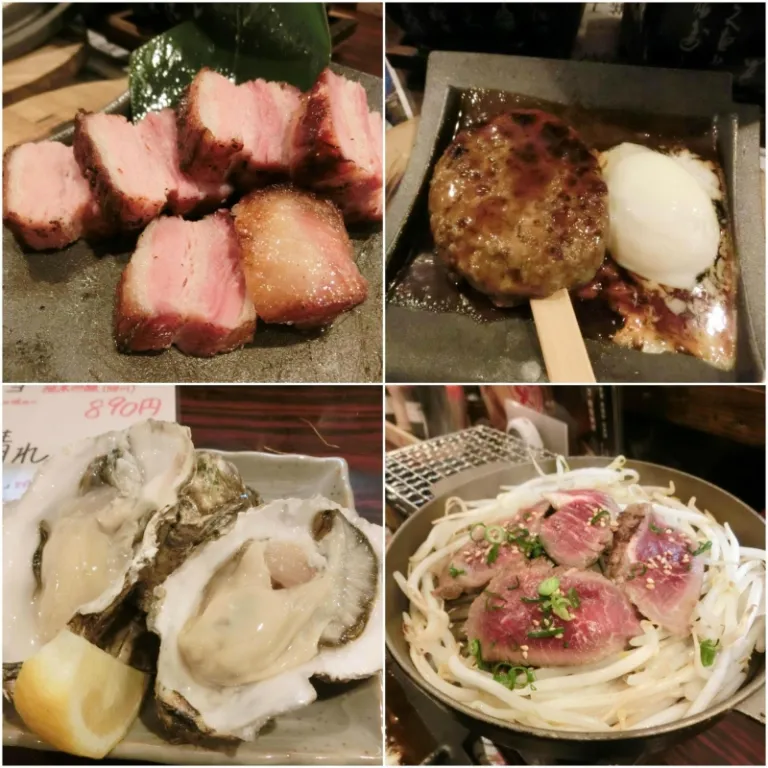
Arriving Obihiro late at night, we found a few izakayas around our hostel that were still opened (some till 3 am). We settled at one (can’t remember which but was really affordable and delicious), having the appetizer each (mandatory!), few fresh oysters (think half a dozen, a la carte), hot sake, 1 portion of pork belly, 1 beef patty with onsen egg and 1 charcoal grilled Genghis Khan for a total of 6182 Yen.
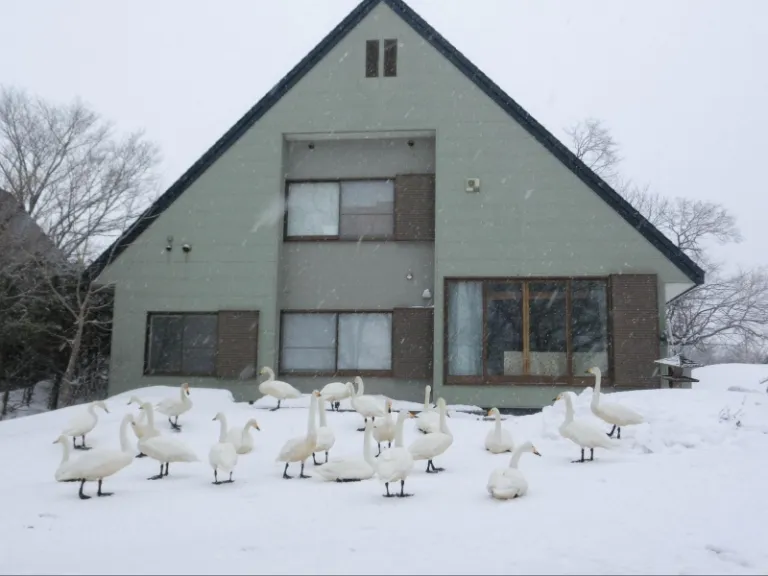
Day 7: Lake Shikaribetsu Kotan and Sapporo
Lake Shikaribetsu Kotan is a winter village with igloos built on the lake when it freezes in winter. You can stay in the igloo houses with built-in ice bed, have a drink in the ice bar and listen to live-band at night, visit the ice chapel, experience ice sculpting or even soak in a hot spring in the open space. Unfortunately, for us, the weather was bad. The strong wind sent snow flying in the air and as a result, snowmobiles and hot springs were not operating. As we were not staying overnight at Lake Shikaribetsu and had to catch the bus back to Obihiro town at 1:10 pm, we didn’t manage to get a drink at the bar too as they only started serving in the evening.
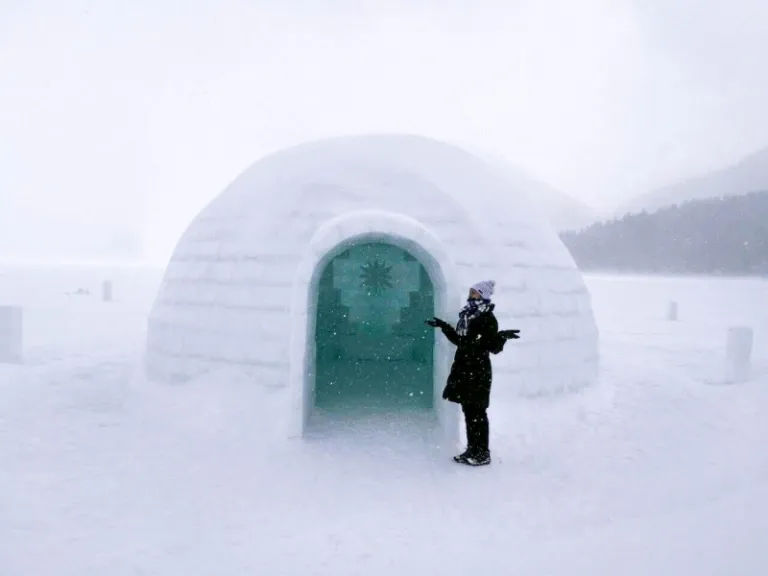

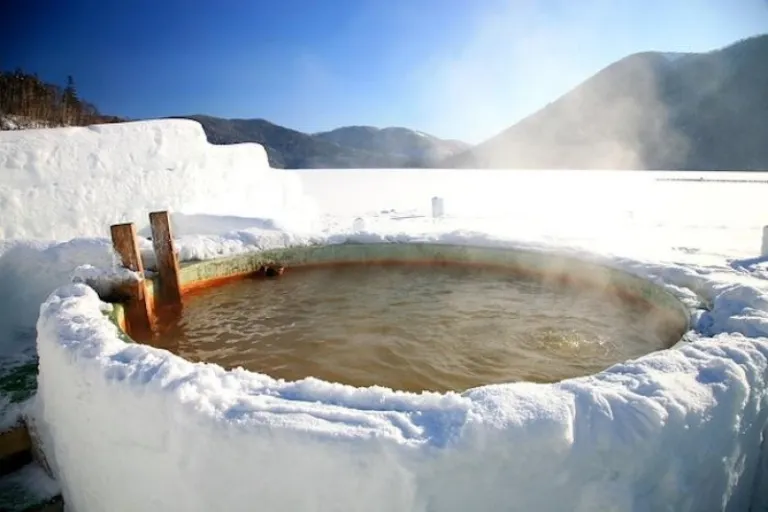
Image credit: Japan Info
Getting to Lake Shikaribetsu Kotan
During the season, the festival provides free shuttle bus from Obihiro JR Station and Shintoku JR Station. The schedule can be found here. You can just hop on the bus as usual at Obihiro JR station but will need to obtain a return ticket from the desk at one of the two hotels located by the Kotan and pass it to the bus driver later when you board the bus back.
What to eat at Lake Shikaribetsu?
At Cafe Mubanchi on the second floor of Lake Shikaribetsu Nature Center, where we sought refuge from the strong wind, served real awesome baked dishes. We had warm milk, hot chocolate and two baked dishes for just 1800 Yen.
Getting to Sapporo from Obihiro
After Lake Shikaribetsu Kotan, we headed to Sapporo in the afternoon by JR train at 3:20 pm, scheduled to arrive Sapporo at 5:56 pm (6700 Yen, 2h 36mins). Our train was late by about an hour for unknown reasons.
Alternative: Chuo Bus is cheaper at 3770 Yen but takes approximately 4 hours. The schedule can be found here (*may have changed).
Getting around Sapporo
Trams, trains, subway, buses are aplenty in Sapporo City. Many of the attractions are also within walkable distance.
What to do in Sapporo?
For the night, we spent our time shopping at Tanukikoji Shopping Arcade where there are duty-free shops, bars and karaokes.
Tip: Get all your souvenirs here especially if you are taking AirAsia which departs from New Chitose Airport at 9 am in the morning, while shops at the airport generally open at 8:30 am. Shiroi Koibito biscuits, Rokkatei’s frozen strawberry choco balls, Royce potato chips, Letao, Calbee’s potato farm, and beauty products etc. etc. can all be found here. Of course, if you are getting items that need to be kept chilled, it would be better to get at the airport if you have time.
*Do not open the bag once they have sealed it for you. If not, they will be subjected to tax.
If you are looking for some night-time activities, Sapporo Bar Hopping Food Tour by MagicalTrip is a perfect match! Hop around local Izakayas recommended by the locals, and you will never miss out on the Japanese nightlife.What to eat in Sapporo/ Hokkaido?
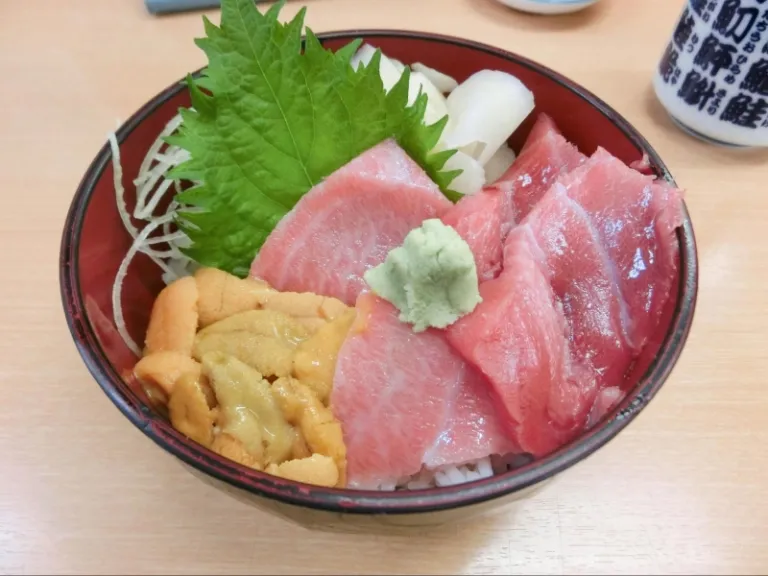
Uni & Toro Don at a random restaurant at Nijo Market
Some of the recommended dishes or restaurants are:
- Genghis Khan – BBQ mutton. Sapporo Beer Garden and Daruma Honten is quite popular for it.
- Soup Curry
- Ramen Yokocho
- Sapporo Kani Honke – crab feast
- Wagyu (of course) – Hokkaido is the birthplace!
Where to stay in Sapporo?
Image credit: Mazamashi Sandwich
We stayed at Mezamashi Sandwich for 2871 Yen in a bunk bed. Great location; close to Nijo market and Tanukikoji Shopping Arcade.
Day 8: Sapporo and Home
As my flight was at 5:25 pm, I had half the day to explore. Though not possible to visit each and every attraction, three to four near the centre should be fine as long as you start the day early. I managed to visit Nijo market for breakfast. Went into a random restaurant and had a mini portion of Uni & Toro don for 1900 Yen including miso soup. Though small, it was filling and the freshness of the seafood was excellent. I then headed to Sapporo Clock Tower, Sapporo Factory for shopping and Odori Park. Having failed to find soup curry, I ended up having the personal Wagyu set lunch (1500 Yen) with Sapporo Beer (400 Yen) along Tanukikoji Shopping Arcade.
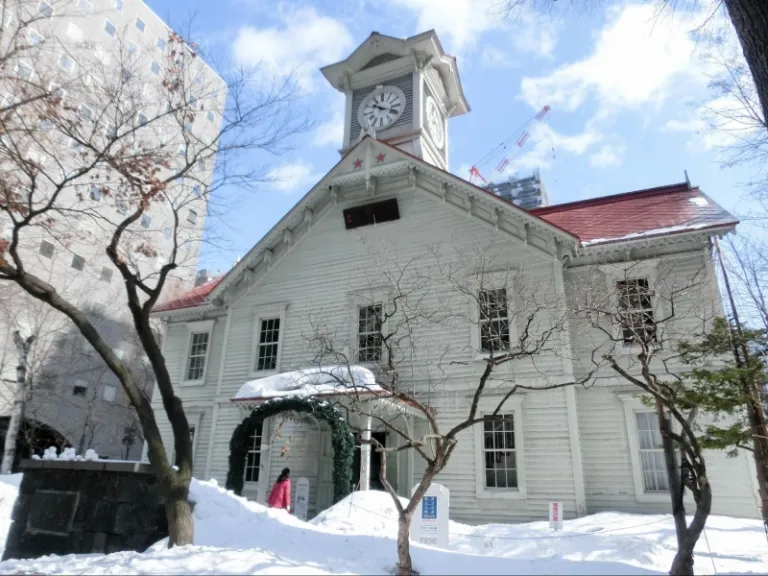
Sapporo Clock Tower
Other attractions:
- Sapporo Teine Ski Area – 35~50mins away from Sapporo Centre
- Shiroi Koibito Park – the factory for the popular Shiroi Koibito biscuits. You can make your own or see how the biscuits are made here.
- Curb Market
- Hokkaido University – great location for autumn foliage
- Hokkaido Shrine
- Mt. Moiwa – popular observation area especially at night when the city lights up
- Sapporo Community Dome – one of Sapporo’s snow festival site
- Historical Village of Hokkaido
- Historical Museum of Hokkaido
- Former Hokkaido Government Office
- Sapporo Beer Museum
- Susukino – Hokkaido’s largest entertainment district
- Sapporo Snow Festival – 2018’s will be held from February 6 to 12
Getting to New Chitose Airport from Sapporo City
JR trains depart almost every 15 minutes from JR Sapporo Station. One-way costs 1070 Yen and takes about 37 minutes. Alternatively, buses are also available though trains are recommended considering the weather and traffic.
I will probably write a guide to planning your own trip to Hokkaido. Let me know if you have any questions and I will include them in the next article if possible!
About Author

Gone with the wind; Yuen Mun spent about a year travelling in the west after a solo trip to Bali where she met several like-minded travellers, and that is how most of her travels happens after - one trip inspiring the next. Not that she only does solo travels, but she finds these trips are often where she found her greatest adventures, and she shares these experiences via Apairofeyes which she rereads occasionally, sparking her wanderlust, wanting to hit the road again.