Popular opinion: you can never have too much cheese! (Unless we’re talking about romance plots… but that’s another discussion altogether, folks.) Honestly, anyone who tells you otherwise is just another ball of negativity that you don’t need in your life. Okay, kidding aside — adding cheese to any dish is almost always a good idea. What would life be without cheese? Man, we wouldn’t wanna know!
So, how about whipping up some ooey-gooey cheesy dishes at home? From your go-to favourites to those with a twist, read on for some of the best cheesy recipes that any cheese lover should try!
1. Chilli cheese fries
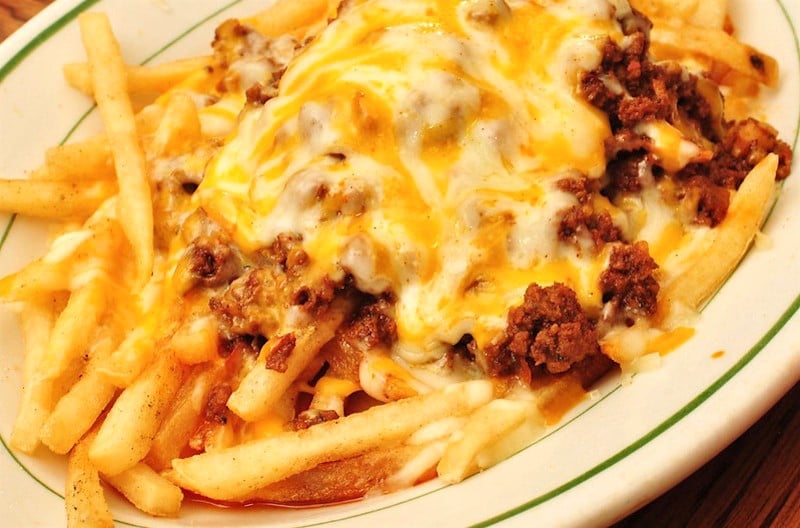
Image credit: jeffreyw
Nothing beats the OG pairing that is cheese and potatoes — specifically, fries! And nothing says ‘deliciously cheesy mess’ better than chilli cheese fries. Enjoy these with some ice-cold beer or soda while watching your favourite shows. But hey, if you’d rather have ‘em for lunch or dinner, then who are we to stop you?
Steps:
- Add four cups of ground beef and three garlic cloves (chopped) in a large pot.
- Add an eight-ounce can of tomato sauce and the rest of the spices: two tablespoons of chilli powder, one tablespoon of ground cumin, one teaspoon each of salt and ground oregano, and ¼ teaspoon of cayenne powder.
- Stir to combine, then simmer on low for at least 20 minutes, until the chilli con carne mixture thickens slightly.
- Optional: Add a bit of water, if you find the mixture to be too thick. It should be easily scoopable enough to drench the fries for later!
- On a parchment paper-lined baking sheet, spread out a 24-ounce bag of frozen french fries in a single, even layer. Then bake in an oven preheated to 425°F, for 25 minutes.
- In a small saucepan, place one and a half cups of milk, ½ cup of cream cheese, two cups of quick-melting cheese, and ½ teaspoon each of cayenne and garlic powder. Cook on very low heat and stir frequently.
- Gradually mix in one and a half cups of shredded cheddar cheese. Add one tablespoon of taco sauce and one teaspoon of the hot sauce.
- Stir the fries halfway through baking. This is to ensure that they’re crispy on all sides!
- Pile the fries onto the centre of the baking sheet. Top them with two cups of more shredded cheddar.
- Broil the baking sheet until the shredded cheddar is melted, but not browned.
- Top the cheesy fries with chilli con carne, followed by the cheese sauce.
2. Fried mac and cheese bites

Image credit (L-R): East Coast Grub; Nutritional Nutmeg
Here’s an easier way to enjoy your mac and cheese: bite-sized pieces that you can happily munch on. No utensils needed either! Crunchy on the outside, but gooey and cheesy on the inside; it’s a delightful snack that’ll surely have you asking for more.
Steps:
- Boil one and a half cups of elbow macaroni, then drain.
- In a separate two-quart saucepan, melt three tablespoons of butter. Then stir in one tablespoon of all-purpose flour and ½ teaspoon of salt. Cook over medium-low heat and stir constantly, until the mixture turns bubbly.
- Add one cup of milk into the mixture, then whisk until the sauce turns smooth.
- Let the sauce boil before reducing to low heat, then simmer for one minute.
- Gradually add one cup each of shredded cheddar cheese and shredded Italian blend cheese and ¾ cup of pimento cheese spread. Stir and cook until these are all melted. Remove from heat after.
- Add the cooked macaroni into the cheese sauce.
- Coat a six-inch square baking pan with cooking spray. Scoop the mac and cheese into the pan, while pressing it down slightly. Refrigerate for at least one hour, or until the mac and cheese are completely cooled.
- In their own separate bowls, place ¼ cup of all-purpose flour, two large eggs (beaten already), and ¾ cup of plain breadcrumbs.
- Cut the chilled mac and cheese into small pieces. We recommend cutting into 16 pieces.
- Dredge each mac and cheese piece in this exact sequence per bowl: flour, eggs, and then breadcrumbs. Divide these breaded mac and cheese bites into two batches.
- In a 12-inch skillet, heat vegetable oil over medium-high heat.
- For each batch, fry the bites for three to five minutes, until golden brown. Turn over the bites every now and then, as to make sure that every side is fried well.
- Drain the bites on a paper towel-lined plate, then serve right away.
3. Bacon-wrapped mozzarella sticks
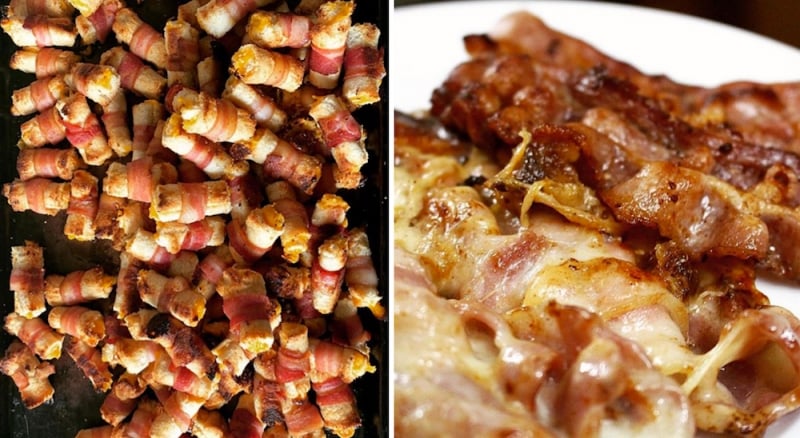
Image credit (L-R): Jason Rutigliano; Perry Hecita
Take a break from the usual popcorn or potato chips as your go-to snack for movie nights. Instead, opt for some ooey gooey mozzarella wrapped in rich, savoury bacon! Let’s be real — the thought of it alone is enough to make one drool and head to the kitchen right away.
Steps:
- On a plate or small baking sheet, place 12 sticks of string cheese or mozzarella. Freeze until fully solid, for about four hours or even overnight.
- Preheat oven to 400°F. Line a medium baking sheet with foil, then place 36 bacon strips in an even layer. Sprinkle with two teaspoons of Italian seasoning.
- Bake for 12 to 15 minutes, or until the bacon strips are slightly crisp but still bendable and soft enough. Remove from oven and let cool for a bit.
- Line a separate baking sheet with foil. Take out the cheese sticks from the freezer.
- Wrap the frozen cheese sticks with three strips of bacon each. Then place on the prepared separate baking sheet.
- Bake for five to seven minutes, or until the cheese starts to melt and the bacon turns fully crisp.
- Serve with your preferred dipping sauce. We recommend the good ol’ marinara!
4. Waffle grilled cheese

Image credit: Weekend at Bennie’s
So, you thought your good ol’ grilled cheese couldn’t get any better? Think again! This cheesy recipe right here is a breakfast game-changer. So, better start your day right with some fuss-free waffle grilled cheese that goes well with just about everything else on your morning dining table!
Steps:
- Heat the waffle iron. In a medium bowl, mix together two cups of waffle mix, one egg, two tablespoons of melted butter, and one and a half cups of milk. Stir until well combined.
- Pour half of the waffle batter into the waffle iron. Cook until the waffle turns golden brown; check the instructions on the waffle mix box for the recommended minutes. Once done, cut the waffles in half.
- In a 10-inch skillet, melt four tablespoons of butter over medium-low heat.
- In a small bowl, mix together two tablespoons of mayonnaise and one tablespoon of Dijon mustard. Spread on one side of each waffle.
- For each bottom waffle piece, place two slices of cooked bacon and some shredded cheddar and shredded Gruyère cheese. Top with another waffle piece like a sandwich, then place in the hot skillet with butter.
- Cook for about five minutes on each side of the waffle sandwich, or until golden.
5. Doughnut grilled cheese
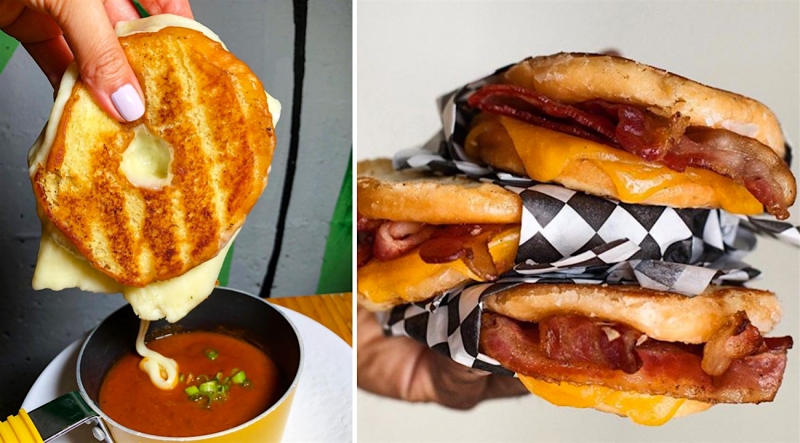
Image credit (L-R): This Plate NYC; Adrian Dimaandal
Here’s another fun twist to your regular grilled cheese: glazed doughnuts for buns! If this isn’t comfort food at its finest, then we don’t know what is. It’s also quite easy to make, so you can easily satisfy those cravings whenever. Oh, and don’t forget to pair it with some delicious tomato soup!
Steps:
- Slice a plain glazed doughnut horizontally in half, then spread butter on each side.
- Preheat a skillet over medium heat. Place one doughnut slice, with the buttered side facing down on the skillet surface.
- Place one slice of cheddar or gouda cheese on the doughnut slice. Top with the other half slice, but this time, let the buttered side face up.
- Flatten with a spatula and cook for about four minutes, or until lightly browned on both sides. Flip every now and then to make sure the cheese is melted!
- Optional: Once done, place a few crispy bacon strips for some additional filling!
Also read: Get Grillin’: Disney Just Gave Everyone Their Grilled 3-Cheese Sandwich Recipe!
6. French onion soup

How about starting your meal with a cheesy French onion soup for your appetizer? Alternatively, you can also enjoy this one on a rainy afternoon at home. Either way, it’s a cheesy recipe that’ll leave you feeling warm, cosy, and satiated. C’est délicieux!
Note: The cheesy recipe below is good for about four servings.
Steps:
- In an eight-quart stock pot, melt ½ cup of melted unsalted butter with two tablespoons of olive oil on medium heat. Add four cups of sliced onions and stir until mixture is tender and translucent, without letting the onions go brown.
- Add four cans of beef broth and one teaspoon of dried thyme. Optional: add two tablespoons of dry sherry as well!
- Heat the oven broiler at 350°F. Transfer the soup into four oven-safe serving bowls.
- Layer each of the four slices of French bread with: one slice of mozzarella or provolone cheese; one tablespoon of diced Swiss cheese; and one tablespoon of parmesan.
- Place one slice of French bread on top of each bowl. Alternatively, you can also break the bread into pieces. Then place the bowls on the baking sheet.
- Broil in the preheated oven for 10 minutes, or until the cheese bubbles and is slightly browned.
7. Burger mac and cheese
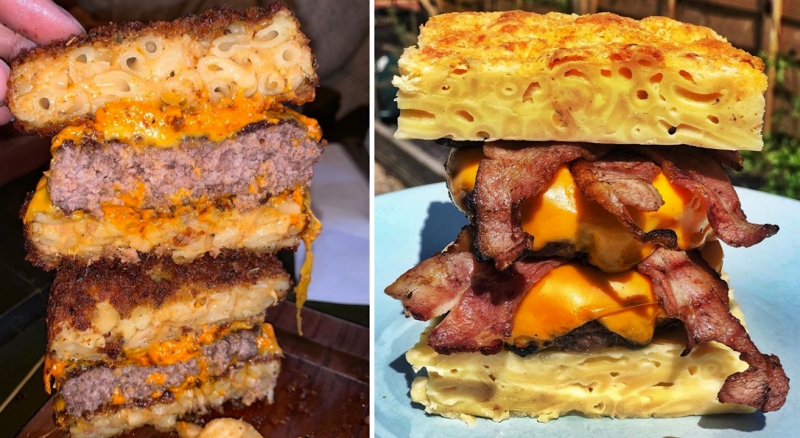
Image credit (L-R): Endi Nardi; Big Daddy B
Okay, so you’re probably thinking, “that’s a heart attack waiting to happen,” from the moment you saw the photo of this cheesy dish. And to that we say, life’s too short to miss out on awesome food. Come on, just look at it — burger and mac and cheese: two all-time favourites combined! How can you possibly resist?
Note: This cheesy recipe is good for about three to four people!
Steps:
- Prepare one pound of elbow macaroni according to package directions. Drain the macaroni and return to the pot.
- Add the following to the pot: four tablespoons of unsalted butter; two cups each of shredded cheddar, parmesan cheese, and cubed American cheese; 12 ounces of whole milk; one tablespoon each of salt and mustard powder; and ½ teaspoon of cayenne pepper.
- Cook in medium-low heat and stir until the cheeses are melted and all ingredients are well combined.
- Remove the pot from heat and then pour the mac and cheese into a baking sheet lined with parchment paper. Spread evenly with a spatula, cover with a plastic wrap, then refrigerate for at least 30 minutes.
- Once cooled, use a ring mold (or any rounded container) that’s about four inches in diameter. Use this to cut out six to eight mac and cheese buns.
- In three separate bowls, place one and a half cups of all-purpose flour, four beaten eggs, and one and a half cups of panko breadcrumbs.
- Dredge each mac and cheese bun in this exact sequence: flour, eggs, and then breadcrumbs. Make sure they’re coated evenly per ingredient in the bowl.
- Preheat vegetable oil to 350°F. Place the buns gently and fry for three to four minutes, until they’re golden brown. Drain oil then transfer to a power towel-lined plate.
- Form six to eight burger patties with an allotted one pound and half of ground beef. Season liberally with salt and pepper, according to your preference.
- Place patties in a cast-iron skillet on high heat. Sear according to your desired doneness, and make sure to flip the patties when halfway through.
- Once done, place the burger in between two mac and cheese buns.
- Optional: place additional cooked bacon strips and a cheese slice alongside the burger patty.
8. Cheesy cauliflower casserole
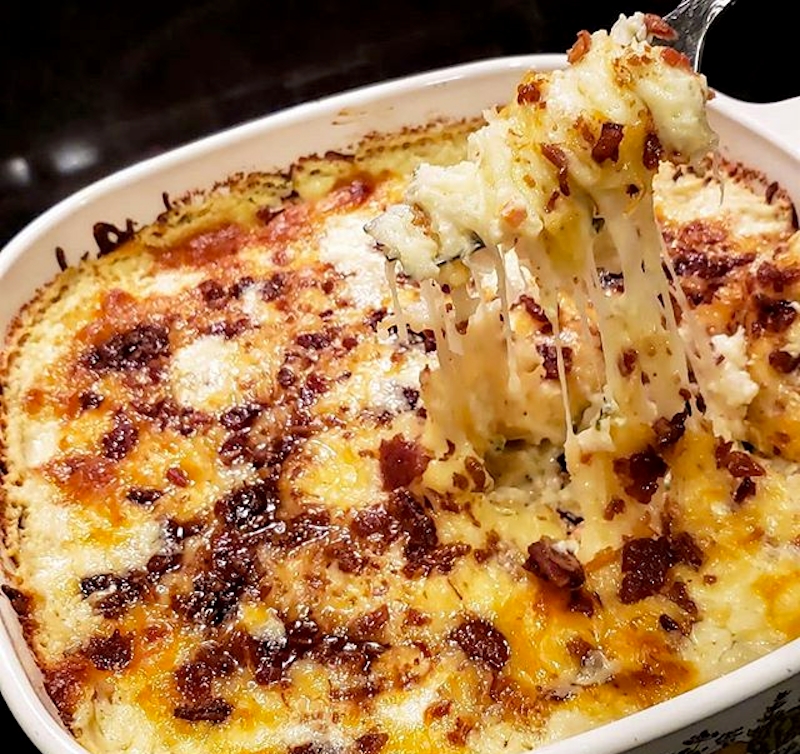
Image credit: Kathy
Imagine all the mouth-watering flavours of a loaded baked potato — but sans all those carbs! Yep, this cheesy cauliflower casserole is an equally flavourful alternative for anyone cutting back on a few calories… or simply prefer something lighter. Either way, it’s a yummy dish that’s definitely worth giving a try!
Note: This cheesy recipe is good for at least six people!
Steps:
- Cut one large cauliflower into small pieces. Add to a large saucepan of boiling water and cook for about five minutes. Drain then transfer into an ovenproof dish.
- Put the saucepan back on the heat. Add two and ¼ cup of milk, 4 tablespoons of flour, and three and ½ tablespoons of butter.
- Whisk for about two minutes, until the butter melts and the mixture comes to a boil. The flour should be fully dissolved and the sauce should begin to thicken and bubble.
- Transfer mixture to the oven-proof dish, on top of the cauliflower bits. Layer one cup of grated cheddar cheese and two tablespoons of breadcrumbs.
- Place the dish inside the oven heated at 425°F. Bake for 15 to 20 minutes, or until bubbly and the topping is lightly browned.
- Optional: add one cup of crispy bacon bits for a mildly meaty topping!
9. Cheese soufflé

Image credit: Pierre-alain dorange
Don’t let the shmancy-sounding term daunt you — this right here is a cheesy recipe that’s simple enough, even for beginners! There’s just something so enticing about cheese soufflés. It could be the airy, pillowy top that looks like a golden brown cloud (and therefore quite Instagrammable!); the light taste that’s a good blend between sweet and savoury; or both.
Note: This cheesy recipe is good for at least two people!
Steps:
- Preheat the oven to 425°F. Coat two soufflé dishes (or large ramekins) with butter and a bit of grated parmesan.
- In a pan, melt one and a half tablespoons of unsalted butter over medium-low heat. Add one and a half tablespoons of flour, then cook for three minutes while stirring constantly.
- Heat a half cup of whole milk in the microwave at medium power for 30 seconds.
- Whisk in milk to the pan and continue stirring, until the mixture thickens.
- In a separate bowl, whisk two egg yolks, along with the following: ½ teaspoon of ground mustard and ¼ teaspoon each of salt and white pepper. Then transfer to the pan. Make sure to whisk steadily to avoid scrambling the eggs!
- Stir in two tablespoons of grated parmesan and ½ cup of your preferred cheese (grated too). Though, we recommend either cheddar, brie, or Gruyère!
- Melt and mix cheese thoroughly. Remove from heat and allow to cool to room temperature.
- In a separate bowl, beat two egg whites to medium-stiff peaks. Optional: add 1/4 teaspoon cream of tartar.
- Thoroughly fold ⅓ of the egg whites into the sauce mixture. Then fold the mixture back into the remaining whites.
- Pour mixture into the ramekins or soufflé dishes then place in the oven.
- Reduce oven heat to 375°F and bake for 30 to 35 minutes, depending on your preferred doneness of the soufflés. Make sure not to open the oven for the first 20 minutes!
10. No-bake classic cheesecake
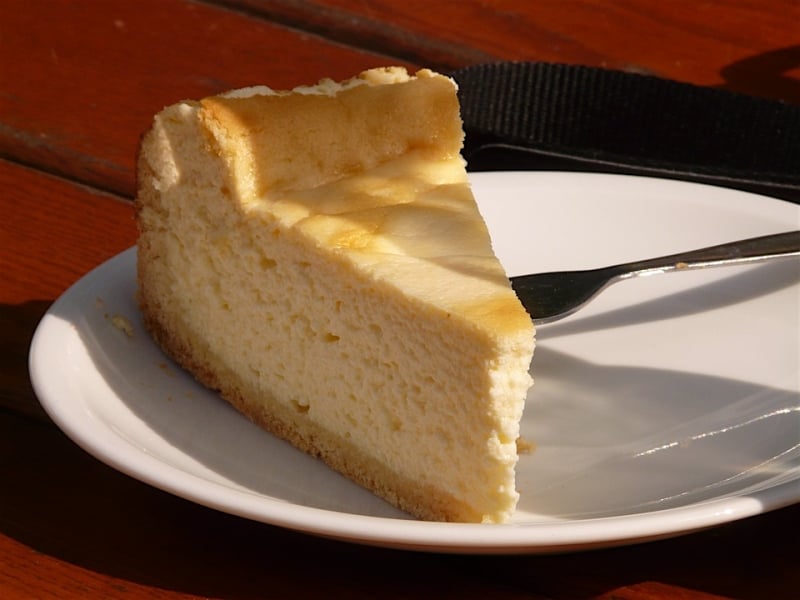
Craving cheesecake but don’t feel like baking? Well, good news: here’s a recipe that doesn’t require turning on your oven at all! It’s the perfect sweet treat for hot weather — i.e., when you’d rather not deal with a hot kitchen or step outside to go to a nearby café. Or if you need a dessert for when you’re hosting a last-minute dinner, then this is your best, fool-proof bet!
Note: This cheesy recipe is good for at least six people!
Steps:
- In a small bowl, add one and ¼ cups of graham cracker crumbs and six tablespoons of melted butter. Mix together to moisten, then press into an eight- or nine-inch glass pie plate. Place this would-be crust in a refrigerator.
- In a separate large bowl, place 16 ounces of cream cheese (must be softened or at room temperature) and ½ cup of granulated sugar. Mix together until smooth and well combined. Make sure to scrape the sides and continue mixing, as to prevent any lumps. Then stir in two teaspoons of vanilla extract.
- Place bowl under a mixer. Then gradually add the one cup of cold heavy whipping cream, but in four increments. Let it whip into the cream cheese mixture per increment.
- Whip for one minute, until it’s thick and creamy. This will serve as the filling.
- Scrape the sides often, as to ensure even mixing. Whip again if needed, but make sure not to over-mix, as this might make the mixture soupy.
- Bring out the crust from the refrigerator. Pour filling on top of the chilled crust, making sure to spread it smoothly and evenly. Cover with a plastic wrap and refrigerate for at least four hours to overnight.
- Once ready to serve, cut into pieces and then top with two tablespoons of whipped cream and/or other add-ons of your choice. We recommend berries, cherry pie filling, and/or salted caramel sauce!
Also read: 13 Yummy Microwave Recipes That Are Easier Than You Think
11. Korean corn cheese

Image credit: anokarina
Make this popular Korean side dish right at home, especially on days when you miss going to your fave K-BBQ place. (*Tears!*) And the best part? This ooey gooey cheesy recipe only takes about five steps!
Steps:
- In a large cast-iron skillet, add two cans of drained whole kernel corn, ¼ cup of unsalted butter, six tablespoons of mayonnaise, and two tablespoons of white granulated sugar.
- Bring skillet to medium heat, then stir the contents, until the butter melts and the corn is evenly mixed in.
- Sprinkle some salt and pepper (according to your preference) and mix again.
- Once the mixture is bubbling and hot, sprinkle one and a half cups of shredded mozzarella cheese. Cover the skillet with a lid, until the cheese has melted.
- Make sure to serve while it’s still warm! Optional: add a dash of parsley flakes.
Also read: 10 Delicious Egg Recipes to Start Your Mornings With!
Release the cheese! Although, truth be told, we can’t decide which of these cheesy recipes we want to try first! How about you?